|
| |
|
How to Tape-Record Primate Vocalisations |
||
|
Version June 2001
Thomas Geissmann A printable version of this text
(in PDF format) can be downloaded here:
Geissmann, T. 2003: Tape-recording primate vocalisations.
In: Setchell, J.M. & Curtis, D.J. (ed.), Field and Laboratory Methods in Primatology:
A Practical Guide, pp. 228-238. Cambridge University Press, Cambridge.
IntroductionOrnithologists have been exploring the possibilities and the methodology of tape-recording and archiving animal sounds for many decades. Primatologists, however, have only recently become aware that tape-recordings of primate sound may be just as valuable as traditional scientific specimens such as skins or skeletons, and should be preserved for posterity. Audio recordings should be fully documented, archived and curated to ensure proper care and accessibility. As natural populations disappear, sound archives will become increasingly important. This is an introductory text on how to tape-record primate vocalisations. It provides some information on the advantages and disadvantages of various types of equipment, and gives some tips for better recordings of primate vocalizations, both in the field and in the zoo. Ornithologists studying bird sound have to deal with very similar problems, and their introductory texts are recommended for further study (e.g. Budney & Grotke 1997; Kroodsman et al. 1996). For further information see also the websites listed at the end of this article. As a rule, prices for sound equipment go up over the years. Prices for equipment discussed below are in US$ and should only be used as very rough estimates. Prices asked by various sellers for the same product differ widely and comparing prices over the internet before buying is recommended. This article does not describe methods and equipment required for sound analysis. Information on that topic has been presented elsewhere (Charif et al. 1995; Hopp et al. 1998).
Sound RecordersSound recorders can be analog or digital. They record an electrical signal generated by a microphone. An ideal recorder records a signal without alterations by at least matching its dynamic and frequency range and by preserving all its features. Traditional analog tape-recorders, both compact cassette and reel-to-reel recorders, are not perfect. They degrade the signals they record by adding hiss, distortion, frequency response alterations, speed variations, print-through effects, and drop-outs. Digital recorders don't have these problems. Within the dynamic range and the frequency limits (due to the number of bits and sampling frequency they use), they record and reproduce signals with great accuracy, low noise, flat frequency response, and no speed variations. Nevertheless, good analog tape-recorders will record a signals in a quality which is good enough for most purposes of bioacoustic studies.
Analog tape-recorders (Audio)In earlier times, tape-recordings made with reel-to-reel tape-recorders were superior in quality to cassette recorders, and many purists are still using the former because they provide the best analog quality. It is possible, nevertheless, to produce high quality recordings with light-weight cassette recorders. These machines weigh much less than reel tape-recorders, which is a great advantage for field studies. Avoid working with noise reduction technologies such as Dolby or DBX. While these noise reduction systems certainly will reduce tape hiss, they add distortion and limit the high frequencies of many sounds. Always switch off Dolby during the recording. If possible, use a tape-recorder with adjustable sensitivity for signal intensity. The automatic level control (ALC) that is found on many portable cassette recorders is very handy for dictation but is often ineffective for recording sounds in the field. Unfortunately, there are very few portable machines with adjustable sensitivity. The Sony Walkman WM-D6 is small, relatively affordable (about $360), and works well in rough field conditions. Bar type metering or LED (light emitting diode) is used. The LED's are difficult to read in bright light; in addition they are positioned on the top rather than on the side facing you as you record, making them difficult to see while recording. Unlike the Sony TC-D5 or the Marantz discussed below, the Walkman has no built in speaker. The mini jack microphone connectors clearly are the weakest part of the machine and broke repeatedly in some of the machines used by me and my students. Their survival can be prolonged if you avoid any lateral pressure acting on the microphone plugs while they are connected to the walkman and if you disconnect the microphone when walking in the forest without recording. Despite these negative comments I have used the WM-D6 in the field for many years and can recommend it. It should be good enough for most of your purposes. The heavier Sony TC-D5M and TC-D5 Pro II exhibit more useful features. The former comes with 1/4" jack microphone connectors and costs about $700, the latter has Cannon-XLR microphone connectors instead and costs $1,000. Since I never had problems with the 1/4" jack connectors, I prefer the cheaper of these two. Both are well-designed and very durable (with metal rather than plastic housing, and a leather carrying case). They have both VU and peak metering; the former is an averaging system for determining recording levels, the latter is instantaneous and is important for animals sound recording where there may be very sudden sound level shifts that can cause overloading. These recorders come with a built-in loudspeaker, which makes it much more comfortable for checking your recordings, and it can be used for simple playback experiments. But these machines are also much heavier than the smaller walkman (ca. 1.7 kg vs. 0.64 kg, with batteries), which makes them less practicable for field use. A single channel Sony, the TCM-5000EV (about $500) is also available (also with built-in speakers) but has mini jack connectors, which may not stand up to the stresses of field use (see also above). It also has a built-in speaker which can be used as a playback or monitor speaker. It is intermediate in price and most features between the walkman and the more expensive machines described above. Unfortunately, it does not offer the ability to use the advantages of different cassettes Types I, II and IV. Several portable cassette recorders with adjustable sensitivity are also available by Marantz (PMD-201 & 222 and CP 430). These machines offer similar features as, but are generally less expensive than, their Sony counterparts described above ($350, $420 and $550, respectively). Only VU metering is provided (no LED's). Carrying cases are not included but are available. The extensive use of plastics in the outer shell and the way some (plastic) function keys are exposed makes them less sturdy and, therefore, less reliably for field use. If you require the ability to play back sounds in the field, you will want to consider a machine that offers a built-in speaker. These speakers exhibit relatively low sound pressure levels and are not recommended for serious play-back experiments with primates. The decision between stereo and mono depends on the uses you have for your recordings. For most field recordings, stereo is an unnecessary complication. However, if you are interested in recording vocal interactions between several individuals or groups, then a stereo machine is preferrable.
DATThe DAT (Digital Audio Tape) recording system stores the sound information in a binary code, thereby making it immune to speed errors, tape noise (hiss) and non-linear frequency response problems. The DAT standard is based on 16 bits of resolution and a sampling frequency of 48,000 samples/second. The frequency response of DAT recorders allows very good recordings from low frequency signals, as low as 10 Hz, up to 22 kHz. Some DAT recorders allow two additional modalities: 16 bit at 44,100 samples/s to allow a direct mastering of CDs and 12 bit at 32,000 samples/s to double the recording duration of the tape. Unfortunately, they can't be used to record ultrasounds: for frequencies higher than 20 kHz specific and expensive instrumentation recorders are required (see below). The DAT recorder delivers a sound quality slightly better than CD in a small, easy to use and easy to store, long duration, tape-based format. Also, digital transfer to and from a computer allows duplication, editing and analysis in an entirely digital domain. Digital transfer from DATs to computers is allowed by specific sound boards with digital I/O which are now produced by several companies. Other features include real-time tape counters and a built-in indexing system which allows the operator to quickly access the starting points of the various recordings. DAT recorders are available from Sony (TCD-D10 $1,000), Tascam (DA-P1 $1,500), and Fostex (PD-4 $5,400). DAT recorders more expensive than analog tape-recorders. Unfortunately, DATs generally are very sensitive to high humidity and, therefore, not reliable in some recording environments such as rainforest. Most DAT recorders have a "dew" or humidity sensor built in that shuts the machine down whenever high humidity is detected. Most DAT machines will operate for only two hours per battery charge, and only accept rechargeable cadmium batteries, a problem when you are working in areas with no or unreliable access to line power.
MiniDisc (MD), Digital Compact Cassette (DCC), MP3Avoid working with technologies which remove information from the sound (MiniDisc, Digital Compact Cassette, MP3). The MiniDisc and DCC media were developed to provide the consumer market with digital performance at low cost. Both provide a relatively high perceptual quality, i.e. they sound good. In addition, MiniDisc offers the random access typical of all disc-based systems. MP3 was developed as a digital sound compression format with particularly small file sizes in order to improve transfer rates over the internet. The name is derived from Motion Picture Experts Group (MPEG), audio layer 3. Depending on the compression rates, sounds range from very poor quality to CD quality reproduction (the latter still being achieved using a data reduction of 1:10-1:12). In addition, there is also a forthcoming MP4 protocol as well as rival formats, such as Liquid Audio and VQF (also called TwinVQ). All these technologies use sound compression algorithms discarding sound details which appear to be non-audible. For instance, MiniDisc technology incorporates input filtering and data compression strategies deliberately designed to distort the signal in subtle ways which makes the signal more difficult to analyse and impossible for accurate frequency-related measurements. It also leads to perceptible distortion if multiple copies are made. Any such technology will change (i.e. degrade) the sound you are recording and make your recordings unsuitable for sound analysis.
What to buy - where is the future?Reel-to-reel machines are almost gone. It is also obvious from changes in the product lists of the major producers of audio equipment that both analog audio cassette recorders and DAT are on their way out. Whereas the analog cassettes will be still around for years to come, the DAT technology never had to build up an equally large user base and may disappear faster. Only few good portable machines of either technology are still being sold, mainly for specialists, and prices for these machines will probably go up as the market dries up. The future will be in the digital media. Unfortunately, currently popular or announced technologies such as MiniDisc, MP3 or MP4 are not an option for bioacoustic analyses. Direct-to-harddisk recording may be the option of the future, but no easily manageable and robust solution is available for long-term use in the rain forest. For the time being, at least, this writer is sticking to analog recording using audio cassettes.
Microphones and parabolic reflectorsIf possible, use a directional microphone or a parabolic reflector (also called parabola). This considerably improves sound collection in nature by either attenuating unwanted ambient noise and sounds from other directions (directional microphones) or by giving emphasis to the sounds coming frontally (parabolic reflectors). Directional microphones are the most useful in bioacoustic field recordings. The directionality of a microphone is usually represented by a polar diagram, i.e. a graphic representation of the sensitivity of the microphone with respect to the frequency and the angle of incidence of the sound. Typically, directionality increases with increasing frequency, i.e. decreasing wavelength. There are three basic directional patterns: omnidirectional, bidirectional and unidirectional, or simply directional. The latter type is of interest here. Various names are in use for microphones with various degrees of directionality. Here, I will just differentiate between shotgun or ultradirectional microphones and semi-directional microphones.
Shotgun or ultradirectional microphonesA shotgun microphone is a cardioid microphone fitted with an interference tube on its frontal face. It is characterised by a flat frequency response, is less sensitive to wind and handling noise but offers a lower sensitivity than a microphone mounted in a parabola. The interference tube cancels off-axis signals while the in-axis signals reach the microphone's diaphragm without attenuation nor gain. As a rule, shotgun microphones work in mono only, so you would need two of them if you really need to make a stereo recording. Usually, however, stereo effects are not required for bioacoustic studies unless you are considering analysing recordings of several simultaneously calling animals. There are many brands of high-quality microphones available, but they are relatively expensive. As a simple rule, the degree of directionality in shotgun microphones correlates with their length (and, usually, with their price). I have tested various models of the Sennheiser line of microphones. They are expensive but they have proven to be very durable, exhibit low noise figures, and are relatively immune to high humidity. Particularly useful in the field is their combination of the ME 66 microphone capsule and the K6 pre-amp/power unit using an AA battery (about $180 and $215, respectively). Put together, this system has a length of 32 cm. For better directionality, you may plug the longer ME 67 (about $250) on the K6. This system has a combined length of 44 cm. The top-of-the-line Sennheiser shotgun microphones have particularly flat frequency curves but are more expensive (MKH 416: $830, 25 cm; MKH 70: $1550, 41 cm). The longeer microphones are not very handy if you intend to follow primates through dense tropical forests; they more easily get in the way and damaged than shorter microphones. Directional microphones by Audio-Technica are less expensive than the Sennheisers, and still exhibit good directionality (e.g. AT 835: $330, 23 cm). In addition, they come equipped with a windscreen. Note that you also need special microphone cables with appropriate connectors for the selected recorder with some Sennheiser directional microphones (available separately, about $30). On windy days, a rubber foam windscreen may be a necessary addition for your directional microphone. Their function is to keep the wind turbulences as far away from the microphone surface as possible. The cheapest one for the Sennheiser ME 66 is MZW 66. It's relatively expensive (about $30), although it's basically just a tight-fitting glove of rubber foam for your microphone. A similar windscreen of your own manufacture should work reasonably well and costs close to nothing.
Semi-directional microphonesSemi-directional microphones produced for video cameras are less directional than the shotgun microphones, but they are cheaper and smaller. They may suffice in some cases, for instance if you are tape-recording "loud-calls" of primates or if you are studying captive animals, where background noise frequently is less of a problem and where the microphone usually can be positioned closer to the vocalising animals. Their degree of directionality and other quality characteristics vary strongly, however (Wölfel & Schopmann 1994). In order to tape-record gibbon songs, leaf monkey loud calls and macaque vocalisations in the field, I used the following microphones with good results: Panasonic VW-VMS1E, JVC MZ-707, and Sennheiser MKE 300 (all below $200). As an advantage, these video-microphones can be directly plugged into the Sony WM-D6C; no special connecting cable is necessary as for the some of the directional microphones from Sennheiser. I recommend, however, buying a cheap elongation cable (1.5 m, less than $6). The microphone should never be too close to the cassette recorder while recording, otherwise you might have the noise of the machine on your tape-recordings. Be careful to select a microphone with a frequency range suitable for your needs. The frequency range of some of the cheaper video-microphones does not exceed 10 kHz, which makes them less suited to tape-record sounds of primates with high-pitched vocalisations (e.g. callitrichids).
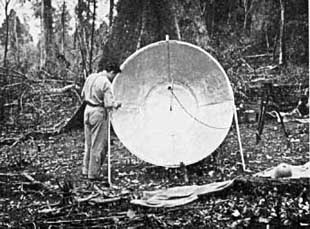
Parabolic reflectorsA parabola focuses incoming sound waves that are parallel to its axis onto a single point, the focus, where a microphone is placed. Whereas a shotgun microphone simply screens off sound from directions other than the sound source, a parabolic reflector can actually amplify the sound from the target direction. In addition, it also acts as a high pass filter especially for low frequency environmental sounds. Its effectiveness is determined by the diameter of the reflector in relation to the wavelength of the sound. Its gain and directivity increase proportionally with increasing the diameter/wavelength ratio. For wavelengths larger than the diameter of the parabola, the response is predominantly that of the microphone itself. As the wavelengths become smaller than the parabola's diameter, gain and directivity increase as the frequency increases. Common diameters are 45 cm, 60 cm and 90 cm with directionality starting respectively at about 750, 550 and 375 Hz. Only the larger dishes can be recommended for primate studies: they are able to cover the frequency range of calls produced by the smaller primate species, at least. Many larger species, however, produce calls which go well below 375 Hz. For a parabola to become effective at frequencies as low as 100 Hz, its diameter must be larger than 3 metres. It is obvious that the size of a parabolic reflector makes it difficult to follow primates through tropical forests with this equipment in hand, even if some plastic parabola (Telinga) can be rolled up for travelling. Parabola may be of better use in stationary recording sites or in more open forests and in open habitat. There are a variety of parabolas available made of metal, fibreglass or clear plastic. Microphones for use in parabolic reflectors typically cost anywhere from $300 to $1,500. Some providers such as Telinga and Saul Mineroff Electronics sell complete systems which include a parabolic reflector with a microphone and shock-mount system. If you have to work on a tight budget, you may consider building a parabolic reflector yourself. With a large bowl- or umbrella-shaped dish, you can add some directionality to any non-directional microphone. The microphone is positioned in the focal point of the reflector which, fortunately, is not very narrowly defined. In this area, the sound is concentrated and yields an increased sensitivity. Björn Merker (pers. comm.) built two parabolic reflectors out of bowl-shaped plastic flower pots, and equipped each with a cheap non-directional microphone and a wire handle. This construction appeared to work well, and, as an advantage, enabled him to make stereo-recordings. When travelling, the plastic bowls could be placed into each other and used to contain cables and protect the microphones or the tape-recorder. When recording, the two microphones were individually directed at one or two of the calling animals.
Other equipmentMany ornithologists recommend the use of good quality headphones which allow you to listen while recording, thereby facilitating proper aiming of the microphone as well as giving a clear idea of the quality of the recording being made. I always found it inconvenient, however, to monitor the vocal activities of primates, often calling from several directions at the same time, with the earphones on, especially when working in the rain forest. Another essential item for field recording is the pitch pipe. If a known pitch is recorded every so often along the tape, it is possible at a later time to adjust the playback speed to match the original recording. The reason for this is that not all cassette machines operate at exactly the same speed. If your recording is to be used for analytical work, accurate time and frequency measurements are of essence. Pitch pipes are available from most music stores and are very inexpensive. I recommend using quality audio-cassettes (e.g. TDK, Maxell). Much cheaper cassettes are available, but some of them may yield fuzzy recordings and some frequency levels may be underrepresented. Of the available cassettes Types I, II and IV, Type II tape offers better high-frequency response and a lower signal-to-noise ratio. Interesting vocalisations tend to occur exactly when the cassette is full, and you will miss them while swapping cassettes. Therefore, I prefer cassettes that let you record for 90 or 100 minutes (instead of those for 60 minutes), because you need to swap cassettes less often with these. Shorter tapes, on the other hand, exhibit a better time accuracy, because they are thicker. Always carry a set of new, unrechargeable batteries with you, for emergencies. Rechargeable batteries need to be recharged frequently. Your animals often decide to vocalise after you have spent hours tape-recording background noise, thus expiring all your rechargeable batteries. In such cases, an emergency set of batteries will come handy.
UltrasoundA number of small primates (e.g. Cebuella, Galago, Microcebus, Nycticebus) have been shown to emit ultrasound vocalisations above 20 kHz (Cherry et al. 1987; Glatston 1979; Pariente 1974; Pola & Snowdon 1975; Zietemann 2000; Zimmermann 1981). Fundamental frequencies of some note types of Microcebus murinus were reaching maximum values of about 45 kHz (Zietemann 2000). Because detecting, recording and analysing ultrasound vocalisations requires special equipment, such calls may be more widespread among small primates (and other small mammals) than has been documented, so far. Fortunately, much research is being carried out on ultrasound calls of bats, and scientists wishing to study ultrasound vocalisations of primates can greatly benefit from exploring the expertise of, and the technologies being used by, bat researchers.
Bat detectorsBat detectors or ultrasound detectors were developed to provide researchers with instruments to study bat echolocation, but are also used for research on other small mammals and grasshoppers. Bat detectors are based on both analog and digital techniques to detect and record ultrasounds and transform them into audible sounds. The detectors available on the market use three main systems: heterodyne frequency shifting, frequency division and time expansion. The most advanced instruments make use of all these three systems to make ultrasounds audible and recordable, with some limitations, on usual audio recorders. Heterodyne detectors and frequency division (or count-down) detectors are real time methods (i.e. you hear the sound from the detector at the same time as it is emitted by the bat). They are useful for quick yes/no statements of bat activity. They allow recording an audible representation of an ultrasonic call, not of the full ultrasonic signal structure. If you want to study the frequency spectrograms, you have to use a time expansion detector (Petterson D980: $3,500; Ultra Sound Advice: U30 + PUSP: $2,867). The time expansion detector is the most accurate system: it retains all information of the original signal. The method is similar to making a high speed tape recording of the sound and then playing it back at a lower speed. But instead of using a huge traditional high speed tape-recorder, the ultrasonic signal is sampled at high speed, then replayed at a lower sample rate, e.g. one tenth, to be made audible and stored in this format on a tape-recorder. If the signal is stored at a sample rate ten times lower than the original one, frequencies are reduced by ten while time is expanded by the same factor. Clearly this is not a real time conversion method, but it does offer a number of benefits over and above these methods. Since the signal is stretched out in time, it is possible to hear details of the sound not audible with other types of detector (for example you can actually hear frequency differences in single short pulses). Time expansion is a technique which preserves all characteristics of the original signal, which makes time expanded signals ideal for sound analysis in the laboratory.
Digital data acquisitionsecond method preserving all characteristics of the original signal consists in recording the ultrasound directly into the memory of a PC-based digital signal acquisition system with fast high-capacity data storage. Modern lap top computers allow for direct high speed sampling of the ultrasonic signals using a separate data acquisition card. With this method, the signal is available for immediate sound analysis, and the sound quality is usually better than in analog recordings. In modern systems, several seconds of sampled sound are stored in a circularly addressed memory ("circular buffer"). The maximum duration of the stored sound depends of the available memory and the selected sampling rate. The advantage of this system is that you can decide post hoc whether you want to keep the current section of your RAM or whether you want to continue sampling. With this convenient method, the recorded sound is constantly being deleted and memory is being freed while you monitor the sound activity of your study animals, until you register some interesting vocal signals. No time expansion is required with this method. You basically need a bat detector with high frequency output (Petterson D980: $3,500; Ultra Sound Advice: U30 without PUSP: $668). Unlike the Petterson equipment, bat detector and time expansion unit are separate units in the Ultra Sound Advice system (U30 and PUSP, respectively). Because you need only the bat detector for digital data acquisition, the Ultra Sound Advice solution is cheaper. The bat detector needs to be connected to a high-speed A/D board inside a laptop computer equipped with a large RAM and a specialised software (e.g. Batsound Pro, 128MB recommended). A complete solution (w/o laptop) is available from Pettersson Elektronik AB (Sweden) for about $6000. Obviously, this ultra sound equipment is more expensive than the one required to record audible sound and also less suitable for field work in tropical forests. Of the two recording techniques described above, time expansion recording on audio tape is more robust in humid tropical environments than the laptop-based system.
Recording procedureBegin tape-recordings with speaking the time into the microphone. Habituate yourself to making frequent comments on tape while recording your animals. This will be very helpful later when you analyse your tape-recordings. For instance, if several individuals are vocalising together, it is often impossible to determine later, who made which vocalisation. Often it is important to record information about the identity, sex and age of a vocalising animal, and about the context in which each vocalisation is produced. It is usually impossible to describe a long vocalisation bout in detail from memory after the tape-recording has been made. Therefore, do it as the vocal bout goes on, but try to speak during intervals between vocalisations. Of course, it is best not to voice input at the same time your target animal is calling. Always narrate "stop" or some other indication that the recorder is turned off before stopping. The lack of critical voiced information on tape, especially where one recording ends and another begins, is one of the greatest failings of the beginner. If you interrupt a tape-recording ("cut"), also say so on the tape. Otherwise, it is often difficult to detect that the recorder was paused and confusion can occur on later analysis. If you continue recording the same or new target subjects following cut, add some narration to say so. Make long, uninterrupted recordings. Vocalisations tend to occur when you think they won't. If you are waiting for a vocalisation to occur, it may be worthwhile to do a continuous recording even while your animals are not vocalising. By doing so, you will catch complete vocalisations or vocal bouts, of which you would otherwise miss the beginning. If no vocalisations occur, you may rewind your cassette from time to time in order not to waste too much tape material. If you already have vocalisations on the same side of the cassette you intend to record on, set the rotation-counter to zero before starting to record again. This will later enable you to rewind to the end of your last recording when you have been tape-recording for some time while no vocalisations occurred. Hold the microphone very firmly and steadily. Even moving your fingers may interfere with recordings. Record from as close to the subject a possible. Directional microphones and parabolic reflectors are no substitute for proximity. Very soft, quiet vocalisations are lost in ambient noise if you are far away from the animal. Occasionally, closer may not be better. If you encounter a loud a sound source such as calling cicadas somewhere between you and your target animals, going closer would bring you closer to the cicadas as well. In this case, it may be better to move to a position with a different angle with regards to the study animal and the calling insects, in order to avoid having the cicadas in your recording direction. When the side of an audio cassette is filled with recordings, always break out the record-enabling chip on the upper left, thin side of the cassette, thus making sure that you won't accidentally record on this side again and delete important material. This can happen when you routinely turn a cassette around thinking you have just filled side A, when, in fact, you have already filled side B. Identify your tape as soon as possible. You may decide to give provisional field numbers to your tapes and give them final inventory numbers when you are back in the lab. In any case, it is important that tapes can be identified at any time and referred to in your field notes. In addition, try to be consistent in your methods and the way you record data. That way, someone else listening to your tape-recordings later can learn your pattern, in your absence, and retrieve important information. The importance of adequate documentation of tape-recordings, often obtained under painstaking efforts and sometimes at much expense, is frequently overlooked by recordists. Lack of documentation seriously weakens the scientific value of your sound recordings. One cut after the tape-recording has been made, the following information should be narrated on tape: 1. Recordist & equipment configuration: name of the recordist; type of recorder; microphone and parabolic reflector. 2. Identification of target subject and the degree of certainty: name of species; type of contact (heard only, seen); number of target subjects on record; sex and age class of target animal(s) or group composition (if known); approximate distance of subject from microphone; cross-references if same individual can be heard on previous recordings. 3. Time & location: date; time at the beginning and the end of recording; time at important occasions (swapping cassettes, calls of new individuals etc.); location (accurate locality, district, province, country). 4. Other Information: type of habitat; weather conditions; behaviour of subject; identification of other sounds in the background. Try to make a written edit of your tape as soon as possible after recordings are completed. Keep a journal of your recordings detailing the contents of your tapes. There, you can also add information which was not narrated onto the tape. Unedited tapes are more difficult to use because you need the equipment and, most importantly, the time to go through the entire tape every time you need information contained therein. Editing tape recordings takes a lot of time but makes your collection of recordings much more usable. It is a good idea, while the day's work is still fresh in your memory, to listen to your tape(s), and make a written record of what you have recorded. Keep your personal collection of wildlife sounds well-documented and in one place. Clearly label both your tapes and the storage box.
AcknowledgementsI thank Dr. Björn Merker for information on hand-made parabolic reflectors. I am grateful to Dr. Deborah J. Curtis, Dr. Sabine Schmidt, Robert Dallmann and Marina Davila Ross for reading and commenting upon earlier versions of this manuscript.
ReferencesBudney, G.F. & Grotke, R.W. 1997: Techniques for audio recording vocalizations of tropical birds. Ornithological Monographs 48. Carpenter, C. R. 1940: A field study in Siam of the behavior and social relations of the gibbon (Hylobates lar). Comparative Psychology Monographs 16(5): 1-212. Charif, R.A.; Mitchell S. & Clark, C.W. 1995: Canary 1.2 userís manual. Cornell Laboratory of Ornithology, Ithaca, New York. Hopp, S.L.; Owren, M.J.; Evans, C.S. (eds.) 1998: Animal acoustic communication - sound analysis and research methods. Springer, Berlin. Cherry, J. A.; Izard, M. K. and Simons, E. 1987: Description of ultrasonic vocalizations of the mouse lemur (Microcebus murinus) and the fat-tailed dwarf lemur (Cheirogaleus medius). American Journal of Primatology 13: 181-185. Glatston, A. R. 1979: Reproduction and behaviour of the lesser mouse lemur (Microcebus murinus, Miller 1777) in captivity. Ph.D. thesis, University College, University of London. Kroodsma, D.E.; Budney, G.F.; Grotke, R.W.; Vielliard, J.M.E.; Gaunt, S.L.L.; Ranft, R. & Veprintseva, O.D. 1996: Natural sound archives: Guidance for recordists and a request for cooperation. In: Ecology and evolution of acoustic communication in birds. (Kroodsma, D.E. & Miller, E.H., Eds.), pp. 474-486. Cornell University Press, Ithaca, New York. Pariente, G.F. 1974: Importance respective du reperage visuel et auditif (absence d'écholocation) chez Microcebus murinus. Mammalia 38: 1-6. Pola, Y.V. & Snowdon, C.T. 1975: The vocalizations of pygmy marmosets (Cebuella pygmaea). Animal Behaviour 23: 825-842. Wölfel M. & Schoppmann, J. 1994: Vergleichstest: Richtmikrophone - Lasst Mikros sprechen. VIDEOaktiv 1994 (8): 4-7 Zietemann, V. 2000: Artdiversität bei Mausmakis: Die Bedeutung der akustischen Kommunikation. PhD thesis, Institut für Zoologie, Tierärztliche Hochschule Hannover. Zimmermann, E. 1981: First record of ultrasound in two prosimian species. Naturwissenschaften 68: 531. Internet sites with review texts on recording nature soundshttp://blb.biosci.ohio-state.edu/ |
|
|
![]()
Site by Thomas Geissmann.
For comments & suggestions, please email to
webmaster@gibbons.de
|
Gibbon |